Things you will need for a successful jailbreak:
- Kindle Voyage
- USB TTL Serial Cable 1.8V
- Thin wire (best 28g
36g)
- Soldering equipment
- Linux PC or Linux Virtual Machine (where you can attach USB devices)
- I used a Ubuntu 14.04 VMWare Virtual machine (no extra drivers were needed)
- Kindle jailbreak from here
- KUAL from here
Ill assume that you will use the TTL-232RG-VREG1V8-WE and Ubuntu 14.04
- Connect you're kindle to your PC and copy the content of 'kindle-5.4-jailbreak.zip' to the root folder of you're kindle
- Copy the KUAL-KDK-2.0.azw2 to the kindle documents folder
- Write down kindles serial nr. ('Home' -> 'Menu' -> 'Setting' -> 'Menu' -> 'Device info')
- Unconnect your kindle
- Open the device and remove the battery connection (you can follow these instructions up to step 5)
- Solder the thin wire to the kindle as shown

- Now connect the thin wire to the USB TLL Serial Cable.
- If you use the TTL-232RG-VREG1V8-WE USB TTL Serial Cable then connect as:
- Kindle TX -> USB Serial RX (Yellow)
- Kindle RX -> USB Serial TX (Orange)
- Kindle GND -> USB Serial GND (Black)
- If you use other USB to Serial connector youre on your own

- Connect the USB cable to your PC (if using VM also connect the USB device to the virtual machine)
- Lets find you're kindle root password (serial number should be without spaces!), open a terminal window and execute
Quote:
|
python -c 'import hashlib,sys;print "fiona%s" % hashlib.md5("%s\n" % sys.argv[1]).hexdigest()[13:16]' YOUR_SERIAL_NUMBER
|
Should see something like
- Next you need to find the tty device name linux assigned
You should see somethind like this, my tty interface is ttyUSB0
Quote:
[ 0.000000] console [tty0] enabled
[ 0.925346] 00:06: ttyS0 at I/O 0x3f8 (irq = 4, base_baud = 115200) is a 16550A
[ 0.952802] 00:07: ttyS1 at I/O 0x2f8 (irq = 3, base_baud = 115200) is a 16550A
[ 103.111933] usb 2-2.1: FTDI USB Serial Device converter now attached to ttyUSB0
|
- Now you need to setup minicom
Select 'Serial port setup' then insert into 'A - Serial device' -> '/dev/ttyUSB0'
and 'F - Hardware Flow Control' set to 'No'
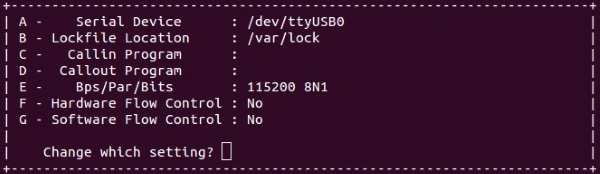
Next 'Save setup as dfl' and 'Exit from Minicom'
- Start minicom console
You should see somthing like this

- Now you need to connect you're kindles battery and power up the kindle (you can connect a USB power adapter to charge your kindle)
- When the kindle is starting you should see some output from your kindle startup in minicom console. You need to stop the autoboot by pressing any key. You must be quick because you have only 1 second delay. If you miss it, you have to restart your kindle.
Quote:
...
sing default environment
In: serial
Out: serial
Err: serial
Quick Memory Test 0x80000000, 0xfff0000
POST done in 59 ms
Battery voltage: 4163 mV
Hit any key to stop autoboot: 1
|
- If you were successful then run command
- On the kinle tap 'Exit' and then 'Reboot or Disable Diags', then 'Exit to login prompt'
- Now you should have a login prompt in mincom type user 'root' and password from above
Quote:
Welcome to Kindle!
kindle login: root
password: *****
|
- Lets create a mount point in /tmp
- Then mount the main file system at that point:
Quote:
|
mount /dev/mmcblk0p1 /tmp/main
|
- Now you need to edit the root password for the main login
On the first line there should be
Quote:
|
root:!:0:0:root:/:/bin/sh
|
delete the ! and save
- Now you can reboot, by typing in 'reboot' and wait for the kindel to boot fully
- Now you can log in to the main system with username 'root' and password ''
- You can change the root password by executing
- Next we need to apply the jailbreak, by executing the following commands
- Finaly we have to reboot and the jailbreak is complete
- To test that the jailbreak works open the KUAL from your kindle book list
- Now you can disconnect the kindle from the USB TLL Serial Cable and tape the thin wire and close your Kindle Voyage
I hope this step by step guide was useful, let me know if you see any mistakes!
I have successfully installed the LibrarianSync to synchronize my collections between calibre and kindle, if there is interest I can make a guide for that to
Some images & text were copied from the following threads, thank you for your hard work
