Just followed your guide and I am now the proud owner of a Jailbroken Voyage.

Like many I think I was disappointed when the Jailbreak fell through as I've been hoping for one since I got my Voyage last year. I was afraid to solder the fine points on the Kindle since the only iron I own is way too big for the job and my soldering skills are rudimentary at best. The nonappearance of the JB, coupled with DennisH's solderless "pin" method and this guide showing up inspired me to take the leap, however.
I wanted to provide some Voyage-specific feedback to hopefully help anyone using a Voyage as a few things were different.
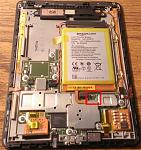
Here you can see the four attachment points on the top bezel, prying these up is the first step.

Remember if you don't have opening tools a screwdriver can do a number on the plastic -- try getting a few cheap guitar picks from a local music store as they're thin, but strong.
This shiny top plastic part is pretty thin and could probably be broken easily. There's a bit of glue to deal with on this part as well and if you pried from the top only you could be in danger of breaking or bending the plastic as most of the glue is at the bottom of the piece. If you have something you can stick in there to pry it from the middle and then the back that would be best. Here's a picture of the top bezel removed, which I think shows the glue you have to deal with and where it would be located pretty well. There's a bit on the grey metal as well.

That was actually the hardest part of disassembly. You have to remove the 4 screws on the grey metal part (keep in mind the two toward the bottom end of the kindle are different than the two on top) then slide the whole back down toward the bottom of the kindle. It will come off without any tools if you just work it.
That's it for disassembly.
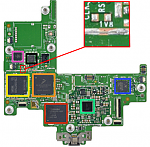
The serial port is fairly easy to locate. I've marked it below.
The hard part was locating the reference voltage joint. I couldn't find anything on the forums and was actually going to post and ask when I noticed the iFixit image of the KV mainboard, specifically this:
Will post more when I'm able -- though you can probably guess most of the rest.