So after I found the 1v8 (verified that it was 1.81v with a multimeter) the rest of the hardware side was pretty straightforward, except for one little interesting mishap. See the small copper pad labeled J1350 in this picture? (The tape is holding the power connector from the battery back.)
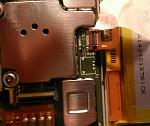
I was trying to take this connector off with my tweezers, but when I touched the J1350 pad I saw a small but very visible spark. Fearing that I'd bricked my favorite little gadget I immediately tried to power it on. The screen was blank for a few seconds then started booting as though I'd switched it completely off. Curious, I stuck my multimeter on it (grounded on one of the plates this time of course) and got a reading of ~4.06v. Also interestingly, when I got done taking the reading and turned the device back on, it restarted itself again. Any idea what this is or what I was doing?
Anyway, back to the productive stuff. Here's the great Cthulhu, taped down as these connections are pretty fragile since they're just wire looped into the holes on the usb board. I put tape on the wires to keep track of which is which -- something I wouldn't do in retrospect as there are only 4 of them and the tape just got in the way.
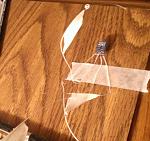
Next I looped the grounding so the exposed section was in a circle and taped it to one of the shielding plates, and twisted the rest of the wires to sewing pins. I tried using cardboard at first to place the pins in but wouldn't recommend it as it was far more finicky than foam. Also you might need to put some pressure on the bottom of whatever material you use and push the pin through a little extra while doing so, since when you push the pin the material will flex and will then pull away from the connection points when you release pressure.
Here's the final setup. White is voltage, yellow is connected to tx on the kindle and rx on the MicroFTX, red is rx - Kindle / tx - board. You can see the big "G" where the grounding wire was looped and attached. I got a really good connection on the voltage pin so I taped it down so as not to jiggle it at all.

Next was all software. Note that I had to reboot the computer to get the COM3 port to show.
Since I was using the pin method the kindle itself was face-down the whole time so I didn't get to see the screen while running through PuTTY. When I rebooted (boy was it great to see the output on the screen though!) it seemed to do just fine, with me interrupting boot then doing bootm 0xE41000. The boot then seemed to stop with the line "sock_init 1888". Note that I never got the diags menu that you show. It just sat at that line for a while. So I tried typing commands and none of them seemed to work so I tried "exit" and got the following:
Code:
get_input_from_stdin Received [EXIT]
        EXIT : command not found
        Usage:
        EXIT DISABLE
        EXIT FASTBOOT
        EXIT LOGIN
        EXIT REBOOT
        EXIT WEB
At first I rebooted, thinking that maybe a second try would do the trick but the same thing happened. This time I typed
and got the login prompt! I figured since this was the whole point anyway it would work out (and it did!).
Once logged in, I followed your instructions until editing in vi. You forgot to put :q quits the program (had to look it up)

. Everything else went great though. I then followed your instructions to the letter until I got to running jb.sh -- I'm sure it should have been obvious but your instructions say
Quote:
|
Copy all of the files from the jailbreak .ZIP to the base directory on the kindle
|
and I blindly just unpacked the kindle-jailbreak-1.14.N-r12627.tar.xz to the root directory, without realizing I had to have unpacked the kindle-5.4-jailbreak.zip as well! You might want to specify that for dummies like me.
Anyway, I remembered there was a bash unzipping utility so I did (after some bungling)
Code:
unzip kindle-5.4-jailbreak.zip
and was then able to do 'sh jb.sh' without a problem.
For the morbidly curious and in case it might contain some info of use to someone or you just want to laugh at me bungling at a command line, here's a
pastebin of the PuTTY log.
Oh, and to you and everyone else who has done such a great job working on this stuff, including you, DennisH, knc1, NiLuJe, and everyone else who has done so much to help with the public knowledge of our devices, I just wanted to say:

(custom screensaver from the screensaver hack)