Part 4: Hackery stuff
This is the most confusing part of the whole jailbreak process. Don't fret! There's lots of pictures so even someone as slow as me can get through things.
1. Get into the diagnostics boot
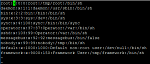
Turn on your kindle, and watch the blank putty window you have open.
As soon as text starts appearing in the window, begin tapping keys on your keyboard.
Text will keep scrolling until the boot is interrupted
Hint: If you you miss the chance to interrupt, and your kindle starts normally, you can "restart" your kindle from its menus and try again
Once the booting is interrupted, the screen will say "uboot >", type this command:
bootm 0xE41000
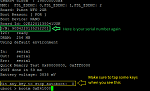 This makes the kindle boot to "diagnostics", which is a place where we can unlock access to the main kindle stuff.
When the diags menu displays, type "
d"

On the next menu type "
l"
("L")
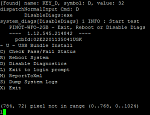
finally, type "
q"

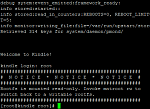
Enter these login credentials:
kindle login:
root
password:
<the password you got from running python, e.g. fionaxxx>
Hint: the password won't show on the screen while you are typing it
Hint: If the password isn't working, you probably copied down your serial # incorrectly. You can cut & paste the serial number from your putty window into the python command and run it again to get the correct password.
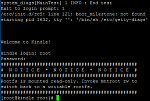 you are now logged in!
2. Edit the password file
vi is a funny little program that edits text files. Linux users prefer to use confusing programs so they can keep dummies like us out of their way... but in this case I'll show you how to sneak through
you are now logged in!
2. Edit the password file
vi is a funny little program that edits text files. Linux users prefer to use confusing programs so they can keep dummies like us out of their way... but in this case I'll show you how to sneak through
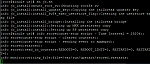
Run these 3 commands to edit the password file:
Code:
mkdir /tmp/main
mount /dev/mmcblk0p1 /tmp/main
vi /tmp/main/etc/passwd
 The Vi program will load and put the password file on the screen
Use the arrow keys to move the cursor over the "x" (it might be a "!" instead) which is right after "root:".
Press "
x" to delete the x
Hint: The "delete" key doesn't actually delete characters in this program. Just roll with it.
 The file now looks like this
 Removing the "x" is telling the system that the main root account doesn't need a password.
Type "
:w" to save the file & exit the editor
The text editor will close, but the file will still appear on the screen. Don't be afraid of that, it's ok.
Type "
reboot" to restart the kindle
 3. Run the jailbreak
Now we get to the meat of the matter! Let's make it rain!
3. Run the jailbreak
Now we get to the meat of the matter! Let's make it rain!
Wait for your kindle to finish booting. It will appear as a storage device on your computer.
Copy all of the files from the jailbreak .ZIP to the base directory on the kindle
"Eject" the kindle from your computer and unplug it.
Warning: Leave the USB serial converter plugged in!
In your putty window, press "Enter"
This will display the login prompt
Type
root to log in
Type these 2 commands:
Code:
cd /mnt/us
sh jb.sh
 The jailbreak will do its business
 Hint: If you are watching the screen, you will see the word "**** JAILBREAK ****" appear at the bottom
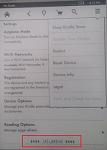
When the PuTTy screen has stopped scrolling,
reboot your kindle again:

Wait for the kindle to finish rebooting
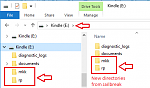
Plug your kindle into the computer and look at the Kindle storage in windows
You will see new directories have been made by the jailbreaking
 4. Protect your jailbreak
Amazon is sneaky, even sneakier than those tiny little screws which will try to escape your tupperware! If we are not careful, they will secretly upload new software to your kindle and ruin everything!
4. Protect your jailbreak
Amazon is sneaky, even sneakier than those tiny little screws which will try to escape your tupperware! If we are not careful, they will secretly upload new software to your kindle and ruin everything!
Hint: Keep your kindle in "airplane mode" all the time. This keeps your precious device safe from Amazon poking at it.
BUT: If you must connect to the internet (e.g., to register your device) We will also set up a little protection to make sure no updates are snuck in under your nose
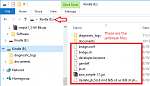
On your kindle create a new directory called: "update.bin.tmp.partial"
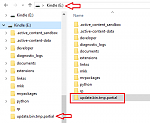 This directory will confuse silly Amazon and stop them from uploading any software
Congratulations! You are now Jailbroken!
At this point you can remove the USB Serial Connector & put your Kindle back together
Or you can leave it until you have installed some tools to confirm everything is working right